Back to UtilityDirect Main Menu
Bill Entry
The first step to utility tracking is to enter your organization's utility bills. The Administrator and Clerk roles have access to enter bills into UtilityDirect.
How to Enter Bill Data
- Click on the Enter Bills tab.
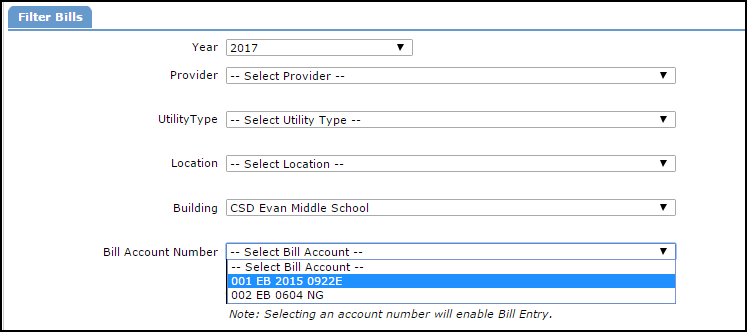
- Select the Fiscal Year for the bill you need to enter. By default, UtilityDirect will display the most current fiscal year, but you can change this to enter bill data from previous years. (For example, if 2016 is selected, the bill will be entered under the 2015-2016 fiscal year.)
- If you know the Bill Account Number for the bill you need to enter, select it from the drop down and the screen will refresh to that Bill Account. You can also use the filter options to narrow the list of bill accounts in the drop down list.
Enter Bills
- The Bill Entry page is where you enter the Start and End Dates, the Usage, and the Cost for each month of the fiscal year. Every bill is different and the necessary information is located in different places. Finding this information on your bills can sometimes be confusing. If you have a bill that you are not sure how to enter, please do not hesitate to contact the Client Service Center for assistance.
- To determine which month your bill belongs in, choose the one that has the most days during that billing cycle. For example, a billing date range from 7/8/15 - 8/9/15 has the majority of days that fall in the month of July. Therefore, this bill would be entered for July. If the date range is 7/20/15 - 8/20/15, then that bill would be entered for August.
- Next to the month you are entering the bill for, enter the Start Date and End Date.
- The Days column will automatically populate once you've entered the Start Date and End Date. Once the first month's start and end dates have been entered, you can enter the number of days in the billing cycle for the following months and the start and end dates will automatically populate in those fields.
- In the Use column, enter the total consumption amount on the bill.
- In the Cost column, enter the cost per unit on the bill. If you are not entering a usage amount, enter the total cost in the Cost column.
- The Total Cost and Avg. Cost will automatically calculate.
- There may be other fields depending on the Utility Type of the bill selected:
- Electric bills will include fields for Registered Demand and Billed Demand.
- Fuel bills (Fuel Oil, Unleaded Gas, Diesel, and Propane) will include Fuel Tickets. This is used when multiple deliveries appear on one bill. Click on the red fuel can icon (
 ) to enter up to 10 fuel tickets per month.
- If you have set up Bill Determinants (Transportation Charge, Delivery Fee, etc.) for this account, enter that information by clicking on the green money bag icon (
 ).
). - Notes can be added to your bill entries by clicking on the yellow note icon (
 ) under the Month column. Enter any special information about the data entered for that month and click Add and Close to save. You can then go back to view those notes when needed. You can also run a Note Report to see the notes for your Bill Account(s).

Saving your Bill Entry
There are several save options at the bottom of the bill entry screen:
- Click Save/Previous Year to save this entry and go to the previous fiscal year for the same account.
- Click Save to save this entry and remain on the current page.
- Click Save/Next Year to save this entry and go to the next fiscal year for the same account.
- Click Save/Next Account to save this entry and go to the next bill account in the drop down list for the same fiscal year.
Editing and Deleting Bills
- To edit a bill entry, remove the information from the field you are correcting, replace the data, and click Save at the bottom of the page.
- To delete a bill, remove all of the data for the month you are deleting and click Save at the bottom of the page.
